Where Do Tattoos Hurt the Most? A Guide to Tattoo Pain by Body Part
Let’s be honest: most people aren’t worried about the stencil. They’re worried about the sting.
Some tattoo spots feel like a scratchy sunburn. Others can be an intense, “white-knuckle the chair” experience. And if you’re trying to choose placement (or plan a longer session), knowing what typically hurts most can save you a lot of stress.
In this guide, you’ll learn:
Why tattoo pain varies so much from one body part to another
The most painful (and least painful) placements—plus what they feel like
How to reduce discomfort and plan your session like a pro
Aftercare steps that protect your tattoo and ease soreness
If you’re in San Antonio, Texas, Southern Tattoo Society helps clients make smart placement choices every day—matching design, location, and pain tolerance with a clean, professional experience. Founded by A.ONE (23+ years of experience), the studio is known for sterile practices, professional artists, and high-quality work for both first-timers and collectors.
Quick answer:
Most painful tattoo placements: ribs, sternum, spine, hands/fingers, feet/toes/ankles, elbows/knees (especially the “ditches”).
Least painful tattoo placements (common first-tattoo picks): outer upper arm, outer thigh, upper back (away from the spine), and parts of the calf.
Table of Contents
Why Tattoo Pain Varies (and Why Some Spots Feel Brutal)
Pain Levels by Body Part (Quick Reference)
Where Tattoos Hurt the Most (Top Painful Areas)
Moderate-Pain Areas (Usually Manageable)
Least Painful Spots (Best for Many First Tattoos)
Inner Arm Pain: What to Expect
Why Tattoos Hurt More on Bone
Tattoo Pain vs. Piercing Pain
How to Reduce Tattoo Pain During Your Session
Safety, Professionalism, and Choosing the Right Studio (San Antonio)
Aftercare: Ease Soreness and Protect the Artwork
Quick Takeaway: Pick the Right Spot for Your Pain Tolerance and Your Design
Book a Consultation at Southern Tattoo Society
Why Tattoo Pain Varies (and Why Some Spots Feel Brutal)
Tattoo pain isn’t one-size-fits-all. Two people can get the same tattoo in the same spot and describe it completely differently. Still, anatomy and technique explain most patterns—especially in the areas that consistently rank as the most painful placements.
Think of tattoo pain as a combination of surface sensation (what your skin feels) and deep sensation (what you feel under the skin). Areas with thin skin, lots of nerves, and not much “cushion” tend to hit both at the same time.
The Biggest Factors That Change Pain Level
Skin thickness: Thin skin generally hurts more and can feel “sharper.”
Nerve density: More nerve endings = stronger signals to the brain.
Proximity to bone: Less cushioning often feels more intense and more “vibrational.”
Muscle/fat padding: More cushion often lowers the “spike” sensation.
Tattoo style & technique: Fine line can feel light and scratchy; heavy shading, solid black, and color packing can feel hotter and more relentless.
Session length: People often feel more sensitive as the body fatigues—even if the first hour felt easy.
Your condition that day: Sleep, hydration, stress, and whether you ate can change your tolerance quickly.
What Pain Often Feels Like (Common Descriptions)
Scratchy: Often reported on arms and thighs, especially with linework.
Hot/stingy: Common during shading or repeated passes.
Sharp: Common near ribs, collarbone, hands/feet, and other bony spots.
Vibrational: Often described on spine, sternum, elbows, knees, and shins.
How to Use This Guide
Use the pain ratings to narrow down placement, then think through three planning questions:
How long will I be in the chair? (A 30-minute piece and a 4-hour piece aren’t the same.)
How detailed is the design? (More detail = more time = more passes.)
How does this area heal in my day-to-day life? (Work uniform, gym routine, shoes, friction, sun exposure.)
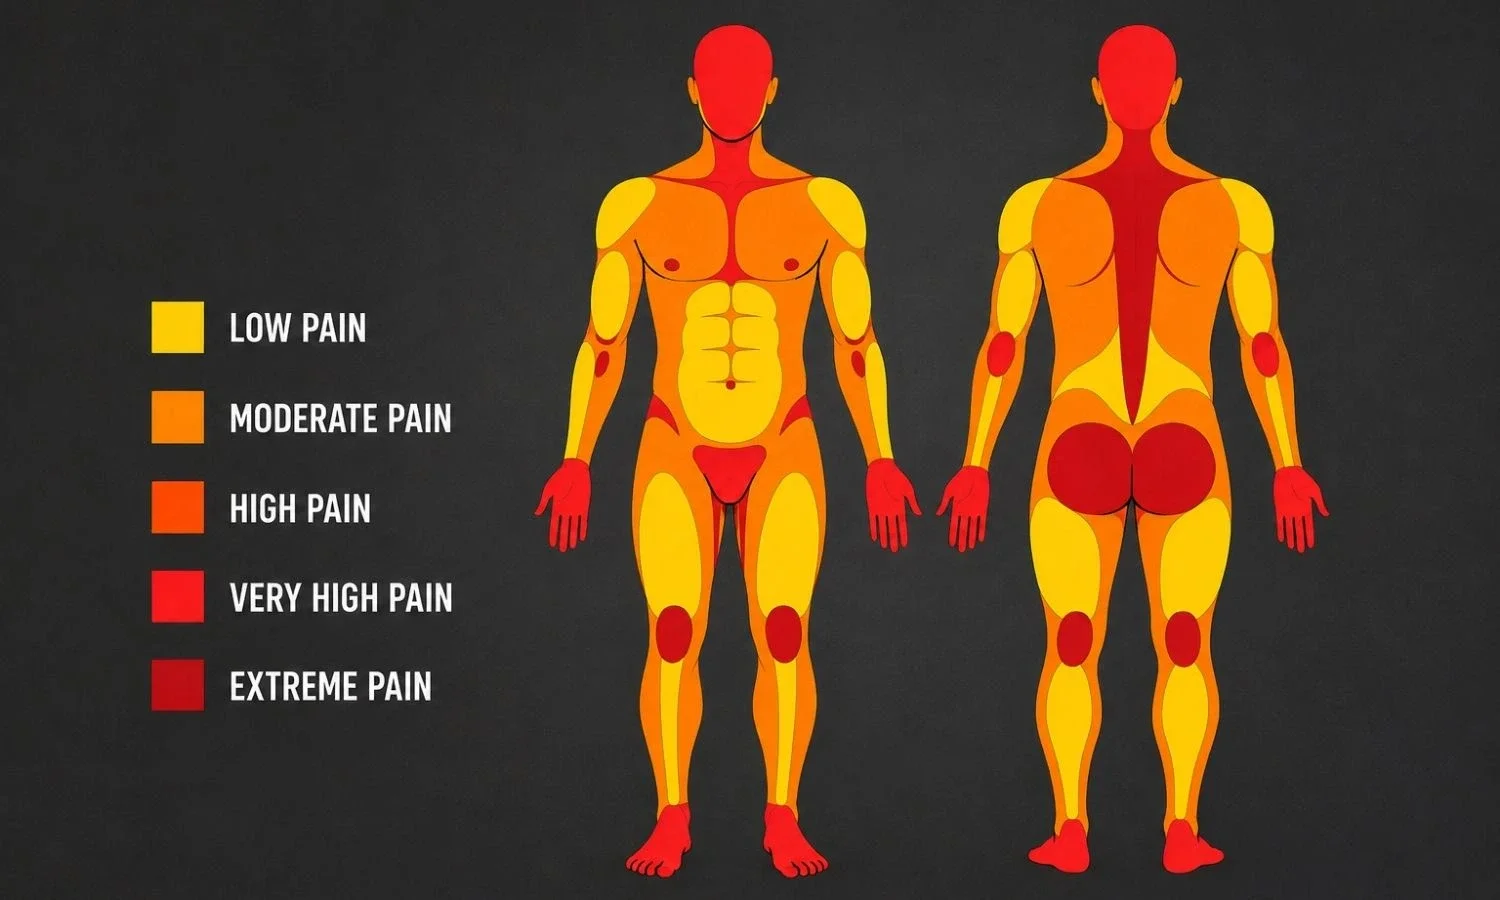
Pain Levels by Body Part (Quick Reference)
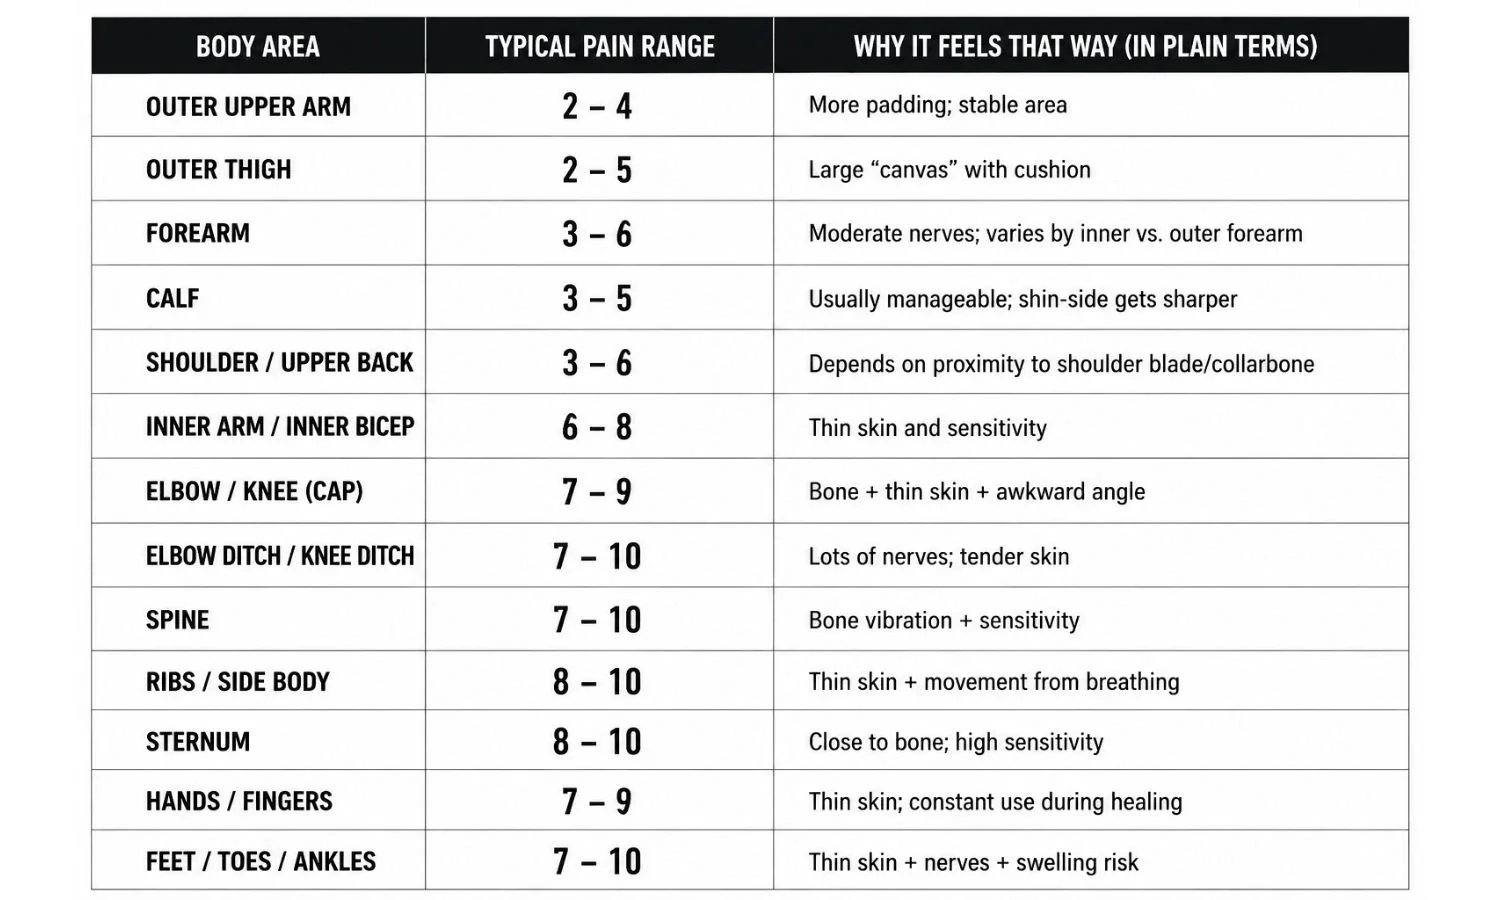
Below is a practical tattoo pain chart style breakdown based on what artists commonly see in the studio. It’s not a medical measurement—just a clear way to compare typical comfort levels from one area to another.
Pain Scale (General):
1–3: Mild (most people tolerate easily)
4–6: Moderate (uncomfortable but manageable)
7–9: High (breaks are common)
10: Extreme (doable, but expect a challenge)
Quick Reference Table
What Can Move You Up or Down the Scale
Time: A spot that feels like a “5” at 30 minutes can feel like a “7” later in the session.
Coverage: Solid fills and heavy shading usually feel more intense than linework.
Healing expectations: Feet, hands, and high-friction areas can feel more uncomfortable after the session because you can’t “leave them alone.”
Where Tattoos Hurt the Most (Top Painful Areas)
If you’re asking which tattoo areas hurt most, these placements are frequent winners (or losers, depending on your perspective). They’re not “bad choices”—they’re just high-sensation zones. The benefit is that these areas can look incredible when the design is planned well.
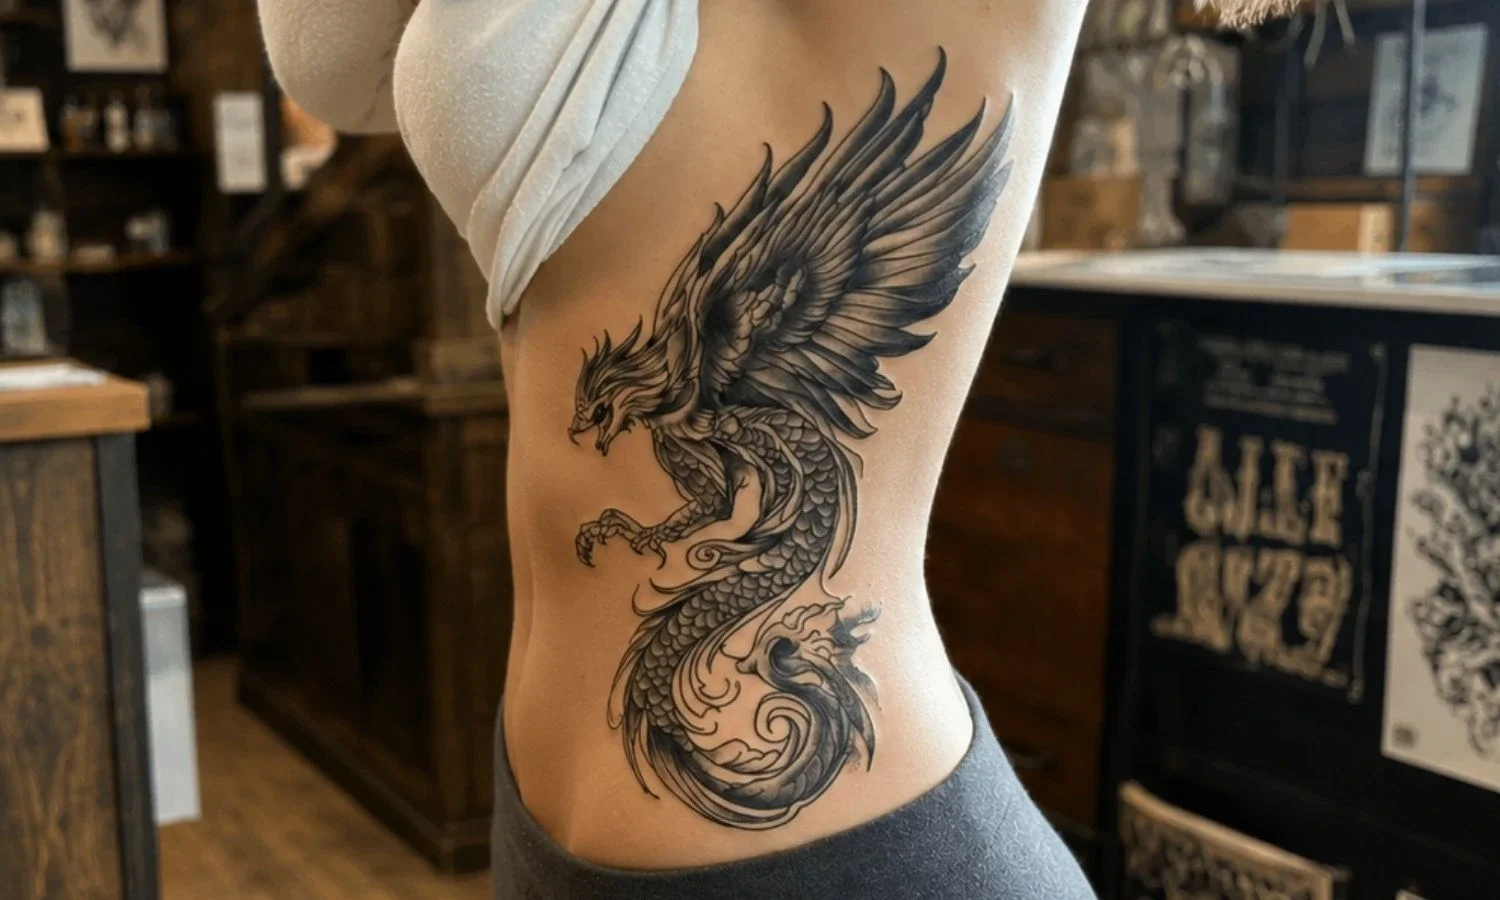
1. Ribs / Side Body (Pain: 8–10)
People ask this constantly: do rib tattoos hurt more? For many, yes. Ribs combine thin skin, constant movement from breathing, and very little padding.
What it often feels like:
Sharp, “scraping” sensation
More sensitivity near the sternum or lower ribs
Intensity climbs during shading or heavy color
What makes rib tattoos tougher: you can’t fully “relax” the area. Even if you’re perfectly still, your body is still moving with every breath.
Planning tip: If you want ribs but you’re unsure about pain, start smaller and plan multiple shorter sessions.
2. Sternum / Underboob (Pain: 8–10)
Sternum tattoos are intense for many people because the skin is thin and the area is close to bone. Breathing and posture changes can also make sessions feel more demanding.
What it often feels like: a strong, hot sting with a noticeable “buzz” when the machine hits directly over bone.
Helpful strategy: Shorter sessions, steady breathing, and planned breaks. If you’re getting a larger piece, ask your artist how they typically break it into stages.
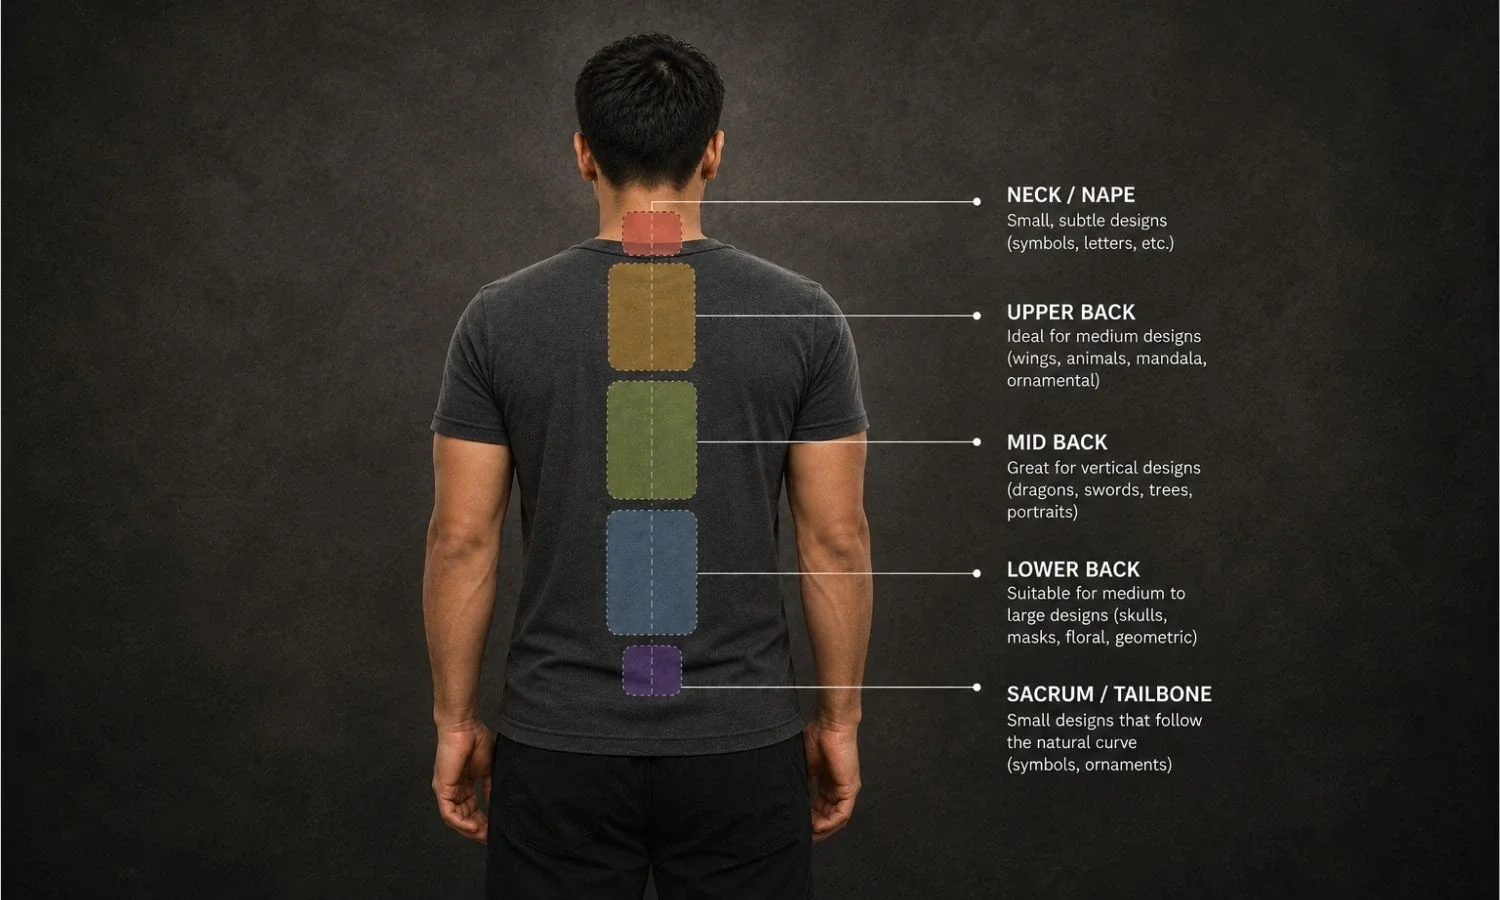
3. Spine / Back of Neck to Lower Back (Pain: 7–10)
Spine pain can swing from “pretty spicy” to “extreme,” depending on how close the needlework is to the vertebrae and how much shading is involved.
Common sensation: a deep, vibrational buzz right on the bone.
What helps: staying in a stable position matters. A good artist will position you so they can work cleanly and you can hold still without tensing for long periods.
4. Feet, Toes, and Ankles (Pain: 7–10)
Feet have thin skin, lots of nerves, and plenty of bone and tendons close to the surface.
What makes feet especially challenging:
Swelling: it’s common, and it can make the first 24–48 hours feel more uncomfortable.
Shoes and friction: you can’t always avoid contact while it heals.
Movement: walking all day right after an appointment is not ideal.
Planning tip: schedule foot tattoos when you can wear loose footwear and take it easy afterward.
5. Hands and Fingers (Pain: 7–9)
Hands and fingers can hurt due to thin skin and nerve density, and they can be tricky to heal because you use your hands constantly.
Two Things to Know Before You Commit:
Healing and longevity: hands and fingers are high-use, high-wash areas. Your artist should set clear expectations about fading and possible touch-ups.
Professional considerations: if visibility matters for your job, talk through placement first. A good studio will help you think long-term, not just “today.”
6. Elbow, Kneecap, and “Ditch” Areas (Pain: 7–10)
Elbow/knee cap: bone + thin skin + awkward angles can make it feel sharp and “electric.”
Elbow ditch / knee ditch: delicate skin with lots of nerves; often a hot, stinging sensation that can feel intense quickly.
Planning tip: if you’re building a sleeve or leg piece, many people prefer to save the ditches for later—once they know how they handle longer sessions.
Moderate-Pain Areas (Usually Manageable)
These placements often land in the “uncomfortable but doable” zone—great options if you want visibility or larger designs without choosing the most intense spots.
They’re also popular because they’re easier to plan for: they tend to hold stencil placement well, they’re stable while tattooing, and many people find the sensation consistent rather than spiky.
Outer Arm (Pain: 3–5)
Generally a crowd favorite. The outer bicep/upper arm has decent padding and stays stable during tattooing. It’s also a great placement for many styles—from American Traditional to black & gray work—because it ages well and isn’t exposed to constant friction.
Forearm (Pain: 3–6)
Forearm is often easier than ribs or sternum. That’s why you’ll see a lot of forearm pieces as first tattoos.
What changes the experience: the inner forearm can feel more sensitive than the outer forearm. If you want the look but want to keep pain down, your artist may be able to “bias” the design toward the outer forearm where it’s typically more comfortable.
Shoulder and Upper Back (Pain: 3–6)
Varies by how close you get to the shoulder blade or collarbone. More muscle generally means lower pain. The upper back is also a strong option if you want room for detail (like Japanese Traditional flow or larger black & gray concepts) without choosing the spine itself.
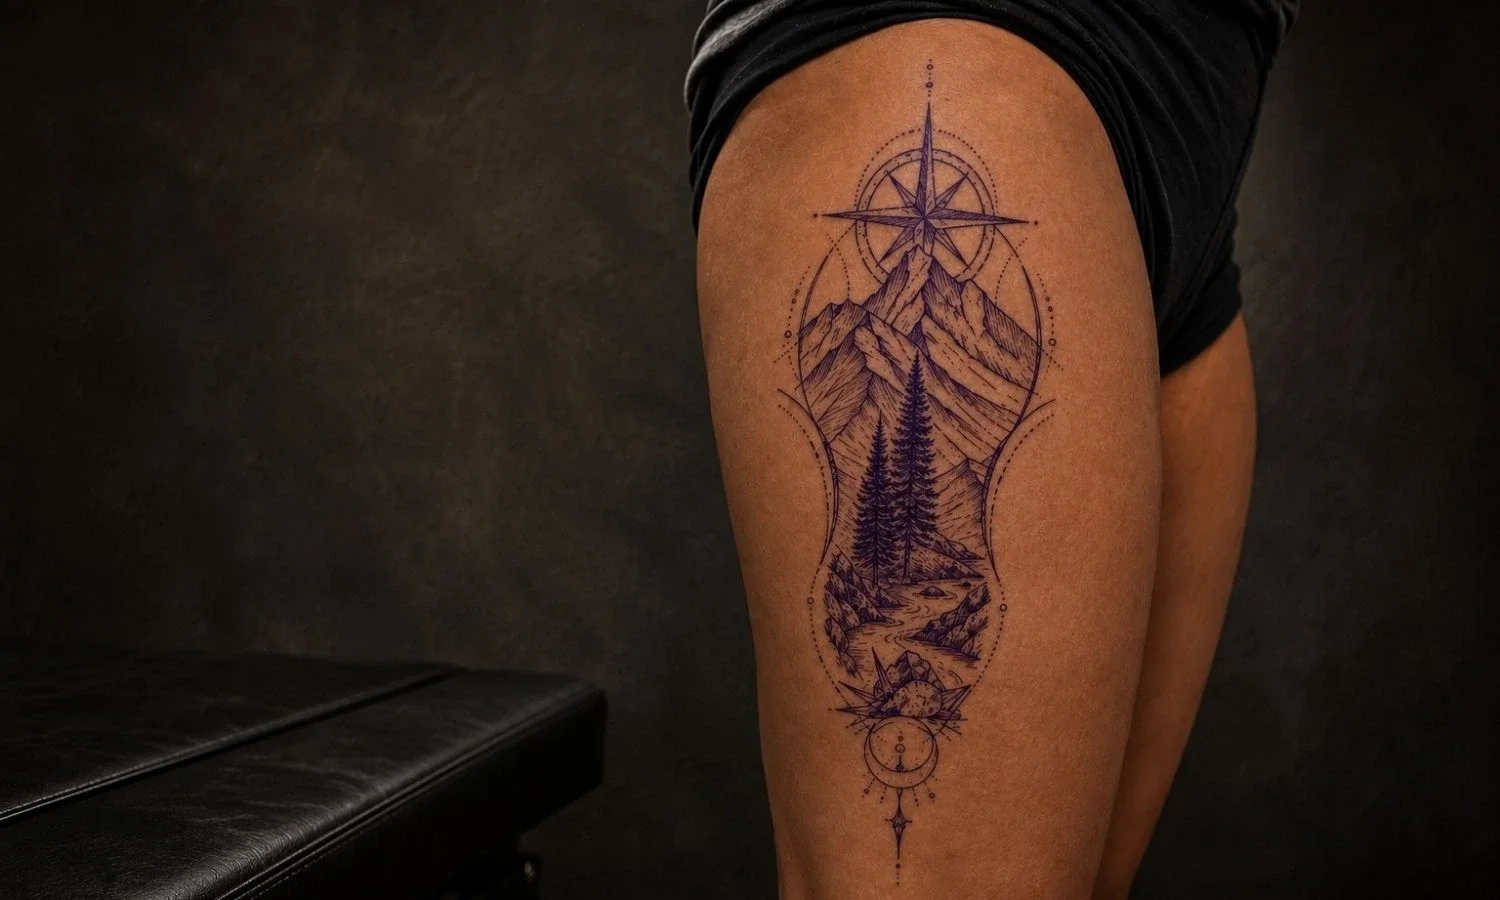
Thigh (Pain: 3–6)
Typically one of the easier large “canvas” areas, especially the outer thigh. It’s a great choice for custom work, color illustrative pieces, and designs that need space to breathe.
What changes the experience: the closer you move toward the inner thigh, the more sensitivity tends to increase.
Least Painful Spots (Best for Many First Tattoos)
If you’re nervous, starting with a lower-pain area can make your first experience smoother—especially if you’re planning a longer session or detailed work.
These placements tend to have more cushion, fewer “spike” sensations, and easier healing because they’re not constantly rubbing against shoes, waistbands, or tight clothing.
1. Outer Upper Arm (Pain: 2–4)
A classic starter placement, especially for medium-sized designs. It’s also a great place to test your tolerance before moving into more sensitive zones like inner bicep, elbow ditch, or ribs.
2. Outer Thigh (Pain: 2–5)
Great for larger work, color, and detailed styles. If you want something with impact but you don’t want to gamble on a high-pain zone, this is one of the safest bets.
3. Calf (Pain: 3–5)
Usually moderate and manageable. The outer calf often feels easier than the shin side. If you’re planning a wraparound design, expect the sensation to change as the needle moves toward the front of the leg.
4. Upper Back (Away From Spine) (Pain: 3–5)
A solid option if you want room for detail and can sit still comfortably. It’s also easier to keep clean and protected during healing compared to hands or feet.
Inner Arm Pain: What to Expect
The inner arm isn’t one uniform sensation. Small shifts in placement can make a big difference.
Inner bicep: Often 6–8 (thin skin + nerves)
Near armpit: Can feel 8–10 (very sensitive region)
Inner forearm: Often 4–7 (varies by person)
Why It Surprises People
Many clients expect the arm to be “easy” because the outer arm is often comfortable. The inner arm is different: it’s softer, thinner, and more sensitive. Even experienced clients can feel that jump.
Design Tips For Inner-arm Comfort
Go smaller first: especially if you’re new to tattoos or new to sensitive areas.
Plan a clean composition: simpler designs can mean less time and fewer heavy passes.
Ask about positioning: sometimes a small adjustment in how your arm is supported makes the session easier to tolerate.
Pro tip: If you want an inner-arm look with less pain, consider shifting the design slightly toward the outer arm while keeping the same overall vibe.
Why Tattoos Hurt More on Bone
When there’s minimal padding between skin and bone, the sensation can feel sharper and more vibrational. Bone-heavy areas also tend to have thinner skin and concentrated nerve endings—so you feel both the needlework and the vibration of the machine.
Common bony pain hotspots:
Ribs
Sternum
Spine
Collarbone
Shins
Elbows and knees
Hands/feet
Bone Proximity vs. “Pain Tolerance”
This is why it’s smart to separate your toughness from the placement. High pain doesn’t mean you can’t do it—it just means you should plan the session differently (size, time, breaks, and aftercare logistics).
Tattoo Pain vs. Piercing Pain
A lot of clients debate tattoo pain vs piercing pain. Generally:
Piercing pain is quick and sharp, then it’s done (followed by soreness).
Tattoo pain is often lower intensity per moment, but it’s repeated for longer—which can feel more mentally demanding.
How to decide if you’re on the fence
If you do fine with a fast “spike,” piercings may feel easier.
If you prefer a steady sensation that you can settle into, tattoos may feel more manageable than you expect.
If you’re nervous about either one, start with a smaller project and build from there.
Southern Tattoo Society is also known for Professional Body Piercing, so you can get honest guidance on whether a tattoo or piercing better fits your goals, pain tolerance, and lifestyle.
How to Reduce Tattoo Pain During Your Session
You can’t “turn off” sensation entirely, but you can meaningfully lower discomfort with the right prep and a smart plan.
Before Your Appointment
Sleep 7–9 hours the night before.
Eat a real meal (protein + carbs) 1–2 hours prior. (Low blood sugar makes everything feel worse.)
Hydrate well the day before and day of.
Avoid alcohol for at least 24 hours (it can increase bleeding and sensitivity).
Limit caffeine if it makes you jittery.
Wear the right clothing: loose, easy access to the area, and something you don’t mind possibly getting ink on.
During The Session
Controlled breathing: slow in, slower out (especially for ribs and sternum).
Distraction: music, conversation, or a show if your artist allows it.
Take breaks early: don’t wait until you’re overwhelmed.
Stay still: fewer sudden movements = cleaner lines and a faster session.
Speak up: if something feels off (pinch, sharp pop, nausea), say it. A professional artist would rather adjust than push through a bad moment.
Numbing Options (Use Responsibly)
People often ask about numbing cream. The most important move: ask your artist first. Some products can temporarily change skin texture or affect how certain areas take ink.
General best practices:
Only use products your artist approves
Apply exactly as directed
Don’t overuse; don’t reapply without guidance
Never use numbing products on broken skin unless specifically directed/approved
What Not To Do
Don’t show up hungover: you’ll dehydrate faster and feel everything more.
Don’t take random painkillers without guidance: if you have questions about medication, ask a medical professional and let your artist know what you’re taking.
Don’t “tough it out” in silence: your artist can work with you, but they have to know what’s happening.
Safety, Professionalism, and Choosing the Right Studio
(San Antonio)
Pain matters—but safety matters more. A professional studio should make you feel confident before the needle ever touches skin.
What “Professional” Should Look Like
Clean, sterile setup and sealed supplies
Clear consultation on placement, sizing, and how the design will age
Artist guidance on pain expectations and session pacing
Direct aftercare instructions (not vague advice)
Comfortable communication: you should feel okay asking questions
The Design Process (What a Good Consult Covers)
Your goal: the style, story, and size you want
Placement: how the design fits your anatomy and movement
Longevity: how that area typically heals and ages
Timeline: whether it’s one session or multiple
Aftercare plan: especially if your work, workouts, or clothing could affect healing
If you like to review policies and prep details before booking, start with the studio FAQs.
How Southern Tattoo Society Supports First-timers and Experienced Clients
Southern Tattoo Society is a locally owned tattoo and piercing studio in San Antonio with a focus on clean execution and high standards. Whether you’re getting your first fine line piece or building a full sleeve, the goal is the same: solid design, safe process, and quality work that heals well.
Styles offered: Custom Tattoos, Fine Line, Black & Gray, Japanese Traditional, Neo-Traditional, American Traditional, Watercolor & Color Illustrative, plus Professional Body Piercing.
Want to choose the right fit for your style and project? Meet the team here: Southern Tattoo Society Artists.
Simple “Green Flags” When Choosing a Local Studio
They’re clear about hygiene and the process
They talk through placement and healing—not just the design
They answer questions directly (no pressure, no vague promises)
They set realistic expectations about pain, time, and outcomes
Aftercare: Ease Soreness and Protect the Artwork
Pain doesn’t stop when the needle stops—especially in high-movement spots like ribs, feet, or inner arm. Good aftercare reduces irritation and helps the tattoo heal cleanly.
What Helps Soreness in The First Few Days
Rest the area and avoid friction
Loose clothing (especially for ribs, sternum, and thighs)
Keep it clean with gentle washing
Moisturize lightly with an artist-recommended product (don’t smother)
Avoid soaking (baths, pools, hot tubs) until cleared by your artist
Avoid heavy sun exposure
A Simple Healing Timeline (What Many People Experience)
Day 1–3: tenderness, warmth, and light swelling are common. Keep it clean and protected.
Day 4–10: peeling and itching are common. Don’t pick or scratch—this is when many tattoos get damaged.
Week 2–4: the surface looks better, but deeper layers are still settling. Keep moisturizing lightly and protect from sun.
If you want a deeper breakdown, read: How Long Does a Tattoo Take to Heal?
Placement-specific Aftercare Tips
Ribs/sternum: avoid tight bras or compression clothing early on. Friction can make the area feel raw.
Feet: plan for swelling; wear breathable footwear; avoid long walks day-of and the day after.
Inner arm: minimize friction; avoid deodorant contact near the armpit area if you’re tattooed close to it.
Hands: follow your artist’s guidance closely—washing is unavoidable, so you’ll want a clean plan to protect the tattoo without over-moisturizing it.
Always follow your artist’s exact instructions—aftercare methods can vary depending on wrap type and tattoo style.
Quick Takeaway: Pick the Right Spot for Your Pain Tolerance and Your Design
Most painful: ribs, sternum, spine, hands/fingers, feet/toes/ankles, elbow/knee ditches
Least painful: outer upper arm, outer thigh, calf, upper back (away from spine)
Pain changes with anatomy, session length, and technique—so a good consult matters.
Use this tattoo pain chart as a starting point, then talk through your design and placement with a professional artist who can tailor the plan to you.
Book a Consultation at Southern Tattoo Society
If you want expert, local guidance in San Antonio, Texas, Southern Tattoo Society can help you compare placements, set realistic expectations, and get a tattoo you’ll love long after the soreness fades.
Ready to take the next step? Book a Consultation or stop by the studio at 7327 N Loop 1604 W #101A, San Antonio, TX 78249 to start your custom design process.